สารบัญ
เปิดสารบัญ
HTMX กับ Project
ช่วงก่อนเปลี่ยน project ผมได้ลองศึกษา framework อันหนึ่งชื่อ HTMX แล้วกะจะมาใช้ใน project แต่ว่ามีเหตุผลบางอย่างที่เปลี่ยน project ไป และก็ได้กลับมาลองเขียน HTMX อีกทีตอนทำวิชา seminar
กดเพื่อดู talk ที่ทำส่งเป็นการบ้าน
รู้จักกับ HTMX
HTMX เป็น JavaScript framework ตัวหนึ่งที่ใช้หลักการ Hypermedia ในการเขียนเว็บ แทนที่จะ render หน้าเว็บด้วย JavaScript ฝั่ง client การเขียนเว็บด้วย HTMX จะคล้าย ๆ กับการเขียนเว็บในสมัยก่อนที่จะส่ง HTML ไปให้ฝั่ง client
ข้อดีของวิธีนี้คือทาง client ไม่จำเป็นต้องมี JavaScript ที่หนัก สามารถใช้ HTML ที่ server ส่งมาได้เลย ที่สำคัญคือไม่ต้องทำ frontend กับ backend แยกกัน ข้อดีข้อนี้จะทำให้การ setup project ของบางงานง่ายลงมาก ๆ อย่างเช่นงานที่ใช้ Django ก็ไม่ต้องสร้าง backend กับ frontend มาเชื่อมกัน แต่ส่ง HTML ไปให้ใช้งานได้เลย
รู้จักกับ Gin
ที่ผมเลือกใช้ Gin ก็เป็นเพราะได้รับการสนับสนุนจากองค์กรชุดดำอยากให้ดูว่า HTMX สามารถใช้กับ backend ภาษาอะไรก็ได้ ไม่จำเป็นต้องเป็น JavaScript หรือ TypeScript
Gin เป็น backend framework สำหรับภาษา Go เป็นที่นิยม ตอนที่เขียนก็มีดาวใน GitHub ตั้ง 76.3k API ของ Gin จะคล้าย ๆ กับ framework อีกตัวที่ชื่อ Martini แต่ว่า Martini ก็ไม่มีใครทำแล้ว
Tutorial หลายที่ก็เลือกที่จะใช้ Gin ในการเว็บ แต่ส่วนใหญ่จะทำ REST API มากกว่า
เริ่ม Project อันเลย
ผมจะถือว่าผู้อ่านติดตั้ง Go แล้วนะครับ ถ้ายังไม่ติดตั้งก็ไปติดตั้งก่อนนะครับ
สิ่งแรกที่ต้องทำคือสร้าง folder project ขึ้นมาแล้วกำหนด go module
mkdir go-htmx
cd go-htmx
go mod init example/go-htmx
คราวนี้เมื่อสร้าง Go module ได้แล้ว ให้ลง library ที่จำเป็น
go get -u github.com/gin-gonic/gin
Go module สมัยใหม่จะลง library ที่จำเป็นตอนที่ import ได้อยู่แล้ว อาจจะข้ามขั้นตอนนี้ไปเลยก็ได้
ต่อมาเขียนโค้ดสำหรับทดสอบว่า Gin ที่ลงมาใช้งานได้ไหม
package main

import (
	"net/http"
	"github.com/gin-gonic/gin"
)

func helloWorld(c *gin.Context) {
	c.String(http.StatusOK, "Hello, World")
}

func main() {
	router := gin.Default()
	router.GET("/", helloWorld)
	router.Run(":8080")
}
ถ้าใช้คำสั่ง go run . เพื่อรันโค้ด ตอนที่เข้า https://localhost:8080 จะเห็นข้อความ Hello, World
เขียน Templates
เราจะไม่ใช้ Gin เพื่อสร้าง REST API แต่จะ render หน้า HTML ออกมา เราจะต้องมี template เพื่อที่ใส่ข้อมูลลงไปใน HTML แบบปลอดภัย ถ้าใช้ String เปล่า ๆ ก็จะเจอ XSS Attack ได้ แถมตอนใส่ข้อมูลก็น่ารำคาญยุ่งยากอีกด้วย
ให้สร้าง folder ชื่อว่า templates ใส่ไฟล์ HTML ที่จะมี template ด้านใน จากนั้นให้สร้างไฟล์ index.html ใน folder มีเนื้อหาดังนี้
<!doctype html>
<head>
  <title>{{ .title }}</title>
</head>
<body>
  <h1>{{ .message }}</h1>
</body>
Go มี library สำหรับ template ภายในตัวอยู่แล้ว ดังนั้นเราก็ไม่จำเป้นต้องติดตั้งอะไรเพิ่ม
{{ }} เป็นสัญลักษณ์สำหรับใส่ข้อมูลด้านใน ข้อมูลใน template จะเรียกว่า pipeline
โดย pipeline จะเป็นอะไรก็ได้ {{ .key }} จะเป็นการเข้าถึง field key ของ pipeline
แบบ pipeline.key หรือเป็นการเข้าถึง value ของ map ในกรณีที่ pipeline เป็น map
จะเข้าแบบเดียวกับ pipeline["key"] ความจริงยังมีอีกแต่ผมยกมาแค่ส่วนที่เกี่ยวข้อง
สำหรับคนที่สนใจสามารถหาอ่านใน documentation ของ Go ได้ครับ
เมื่อเขียน template เรียบร้อยแล้ว เราก็แค่แก้โค้ดเดิมให้ render template ใหม่
package main

import (
	"net/http"
	"github.com/gin-gonic/gin"
)

func helloHTML(c *gin.Context) {
	// gin.H is an alias for map[string]any
	c.HTML(http.StatusOK, "index.html", gin.H{
		"title": "Hello, World",
		"message": "Hola Mundo"
	})
}

func main() {
	router := gin.Default()
	// Load template files
	router.LoadHTMLGlob("templates/*.html")
	router.GET("/", helloWorld)
	router.Run(":8080")
}
ถ้าเขียนทุกอย่างถูกต้อง หน้าเว็บจะมี title ว่า Hello, World แล้วมีเนื้อหาว่า Hola Mundo
ลงมือเขียนจริง
เริ่มจากไฟล์ templates
ตอนนี้ผู้อ่านน่าจะคุ้น Gin กับ template ของ Go แล้ว เรามาลงมือเขียน HTMX กับ Gin กันดีกว่า
ก่อนอื่นเราจะต้องลง library HTMX ซึ่งมันลงง่ายมาก ๆ แค่ใส่ script tag เข้าไปในไฟล์ HTML
ก็ใช้งานได้แล้ว
ให้สร้าง folder fragments ใน folder templates แล้วสร้างไฟล์ชื่อ head.html เนื้อหาดังนี้
{{ define "head" }}
<meta charset="UTF-8" />
<meta name="viewport" content="width=device-width, initial-scale=1.0" />
<title>{{ . }}</title>
<!-- Pico.css -->
<link
  rel="stylesheet"
  href="https://cdn.jsdelivr.net/npm/@picocss/pico@2/css/pico.min.css"
  integrity="sha384-7P0NVe9LPDbUCAF+fH2R8Egwz1uqNH83Ns/bfJY0fN2XCDBMUI2S9gGzIOIRBKsA"
  crossorigin="anonymous"
/>
<!-- HTMX -->
<script
  src="https://unpkg.com/[email protected]"
  integrity="sha384-ujb1lZYygJmzgSwoxRggbCHcjc0rB2XoQrxeTUQyRjrOnlCoYta87iKBWq3EsdM2"
  crossorigin="anonymous"
></script>
{{ end }}
จะเห็นว่านอกจาก HTMX แล้วผมจะใส่ Pico.css เข้ามาด้วย
Pico.css เป็น CSS framework แบบไม่ต้องใส่ class แต่จะให้ HTML เป็นแบบ semantic HTML
นั่นก็คือ HTML ที่ tag มีความหมายแบบที่มันควรจะเป็น เช่น header ก็จะเป็นส่วนหัว h1 ควรจะใหญ่กว่า h2 เพราะว่าเป็นหัวข้อใหญ่กว่า ซึ่ง Pico.css ก็มี class มาให้บ้าง แต่ก็เป็นพวก container มากกว่า
สาเหตุที่ผมเลือก Pico.css มาเพราะอยากให้ tutorial นี้กระชับ และไม่มี class รก ๆ โดยไม่จำเป็น ถ้าทำ demo หรืออะไรเล็ก ๆ น้อย ๆ Pico.css ก็เป็นตัวเลือกที่ดีนะครับ
คำสั่ง define เป็นคำสั่งสำหรับสร้าง template ด้านในไฟล์อีกทีหนึ่ง ทำให้เราสามารถเรียก template
จากที่อื่นโดยใช้คำสั่ง template ได้
<!-- With pipeline -->
{{ template "head" .}}
<!-- With nil pipeline -->
{{ template "head" }}
โค้ดด้านบนเป็นตัวอย่างนะครับ
ต่อมาให้สร้างไฟล์ article-card.html ใน folder fragments สำหรับแสดงบทความ ด้วยเนื้อหาดังนี้
{{ define "article-card" }}
<article>
  <header><h2>{{ .Title }}</h2></header>
  <p>{{ .Content }}</p>
</article>
{{ end }}
ไฟล์ article-form.html ใน folder เดียวกัน
{{ define "article-form" }}
<form
  hx-post="/articles"
  hx-target="#article-section"
  hx-select="#article-section"
>
  <label>
    Title
    <input type="text" name="title" id="title" />
  </label>
  <label>
    Content
    <textarea name="content" id="content"></textarea>
  </label>

  <input type="submit" value="Submit" />
</form>
{{ end }}
Attributes ที่มีคำว่า hx จะเป็น attributes สำหรับ HTMX
hx-post= ถ้าส่งฟอร์มนี้ ให้สร้างPOSTrequest ไปตาม URL ที่ใส่มาhx-target= ให้ HTMX แก้ไข element ที่เลือกไว้ตาม response ที่ได้มาhx-select= ให้เลือกเฉพาะ element ที่กำหนดไว้เท่านั้นมาใส่ ไม่ต้องใส่ทั้งหน้า
พอรวม ๆ กันแล้วจะได้ว่า ถ้าส่งฟอร์มนี้ จะมี POST request ไปที่ /articles จากนั้น
จะเลือก #article-section มาจาก HTML ที่ server ส่งมาตามที่กำหนดมาใน hx-select แล้วเปลี่ยน #article-section
ให้เป็นของใหม่ตามที่กำหนดไว้ใน hx-target
HTMX ยังมีวิธีเปลี่ยน element อีกหลายแบบ เช่น เอามาเพิ่มด้านใน เปลี่ยนเนื้อหาด้านในแต่ไม่แทนที่ ซึ่งสามารถศึกษาได้จาก documentation ของ HTMX
สร้าง folder ที่ชื่อว่า pages ใน folder templates และสร้างไฟล์ articles.html
ด้วยเนื้อหาดังนี้
<!doctype html>
<html lang="en">
  <head>
    {{- template "head" "All Articles" -}}
  </head>
  <body>
    <main class="container grid">
      {{- template "article-form" -}}
      <section id="article-section">
        <h1>All Articles</h1>
        {{ range . }} {{- template "article-card" . -}} {{ end }}
      </section>
    </main>
  </body>
</html>
ระบบ template ของภาษา Go ไม่มีการทำ inheritance แบบตรง ๆ ถึงทำได้การโหลด template
ใน Gin framework ก็ยุ่งยากกว่าเดิม ผมเลยให้เป็นไฟล์ใหญ่ ๆ แล้ว include บางส่วนด้วยคำสั่ง template แทน
เขียน Go
ปกติแล้วโค้ดที่ดีจะแยกการจัดการข้อมูลกับโค้ดการทำงานออกจากกัน แต่เพื่อเป็นการประหยัดเวลา ผมจะให้โค้ดที่จัดการบทความทั้งหมดอยู่ใน package handlers ครับ
สร้าง folder handlers ที่บนสุดของ project แล้วสร้างไฟล์ articles.go ด้วยเนื้อหาดังนี้
package handlers

import (
	"net/http"

	"github.com/gin-gonic/gin"
)

type Article struct {
	Id      int    `json:"id"`
	Title   string `json:"title"`
	Content string `json:"content"`
}

var articles = []Article{
	{
		Id:      1,
		Title:   "Article 1",
		Content: "Content 1",
	},
}

func GetArticles(c *gin.Context) {
	c.HTML(http.StatusOK, "articles.html", articles)
}

func PostArticle(c *gin.Context) {
	// We get data from the form.
	title := c.Request.FormValue("title")
	content := c.Request.FormValue("content")
	id := len(articles) + 1
	articles = append(articles, Article{Id: id, Title: title, Content: content})
	// Let's replace the entire thing.
	c.HTML(http.StatusCreated, "articles.html", articles)
}
GetArticles จะ render หน้า articles.html ด้วยข้อมูลจากตัวแปร articles ที่อยู่ในไฟล์
ส่วน PostArticle จะสร้าง Article ใหม่ตามข้อมูลใน form ที่ส่งมา เมื่อสร้างเสร็จก็ render
articles.html กลับไปอีกครั้ง
ต่อมาก็ให้เขียนไฟล์ main.go ใหม่
package main

import (
	"github.com/gin-gonic/gin"
  // Use your own module name here
	"github.com/pontakornth/go-htmx/handlers"
)

func main() {
	router := gin.Default()
	router.LoadHTMLGlob("templates/**/*.html")
	router.GET("/articles", handlers.GetArticles)
	router.POST("/articles", handlers.PostArticle)
	router.Run(":8080")
}
จากนั้นเมื่อ run โค้ด แล้วไปที่ [https://localhost:8080/articles] เมื่อส่งฟอร์มที่กรอกไปก็จะเห็นว่ารายการ articles ถูกเปลี่ยนถามข้อมูลที่ส่งไป และเว็บก็ไม่ได้ถูกเปลี่ยนทั้งหน้า เพราะ HTMX เลือกบางส่วนมาเปลี่ยนเท่านั้น
ส่ง JSON ด้วย Content Negotiation
จะเห็นว่าใน Article ผมมีรูปแบบ JSON เพิ่มมาแต่เรายังไม่ได้ใช้ JSON กันเลย
การเขียนเว็บด้วย HTMX จะใช้ได้ใน browser เท่านั้นเพราะว่ามันส่ง HTML แต่ถ้าต้องการ data API ด้วย ก็สามารถตั้งค่าให้มันส่ง JSON ด้วย Content Negotiation
การส่ง HTTP request จะมี header ตัวหนึ่งชื่อว่า Accept ที่จะกำหนด format ของ response
ตามมาตรฐาน HTTP ดังนั้นถ้าเรากำหนดตรงนี้เป็น JSON ก็จะสามารถให้ server ที่รองรับส่งค่าเป็น JSON ได้
ค่าที่ต้องการจะเป็น application/json แต่ว่าถ้าใช้ Gin ผมจะแนะนำให้ใช้ค่าคงที่แทน string ปกติ
func GetArticles(c *gin.Context) {
	f := c.NegotiateFormat(gin.MIMEHTML, gin.MIMEJSON)
	if f == gin.MIMEJSON {
		c.JSON(http.StatusOK, articles)
		return
	}
	c.HTML(http.StatusOK, "articles.html", articles)
}
รูป
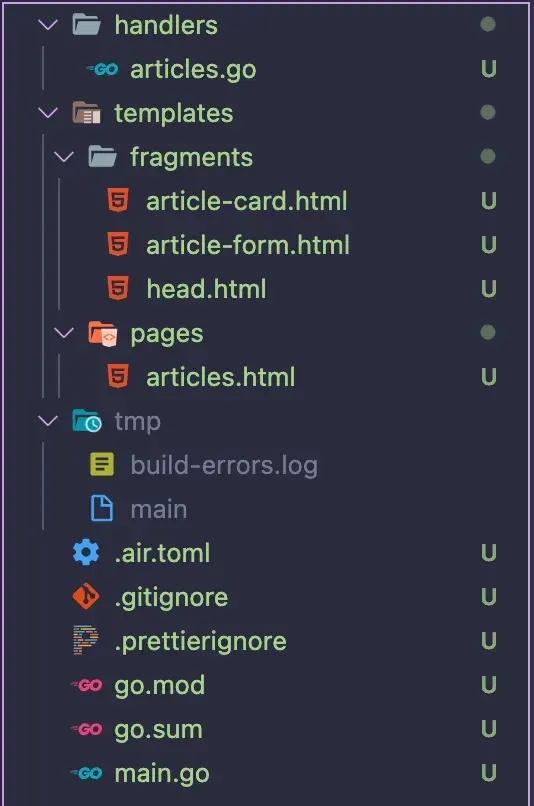
Project Structure (ไม่ต้องสนใจ Air)

ตัวอย่างหน้าที่ทำเสร็จแล้ว
ข้อมูลสำหรับศึกษาเพิ่มเติม
- https://htmx.org - เว็บไซต์ทางการของ HTMX
- https://picocss.com - เว็บไซต์ทางการของ Pico.css
- https://hypermedia.systems - E-book สำหรับการทำเว็บแบบ Hypermedia-driven application เขียนโดยคนสร้าง HTMX
- https://github.com/gin-gonic/gin - Repository ของ Gin
- https://pkg.go.dev/text/template - Documentation ของ template ในภาษา Go
- https://pkg.go.dev/html/template - text/template ที่เพิ่มความปลอดภัยสำหรับ render HTML
- https://github.com/pontakornth/go-htmx - โค้ดที่เขียนใน post นี้